INOVATO HamClocks are known for being sensitive to power fluctuations. This simple and inexpensive project is just the solution if you would like to keep your device running.
PARTS:
- Junction Box, Zulkit Project Box IP65 Waterproof Outdoor Box ABS Plastic Electrical Boxes Electronic Enclosure Black 3.94 x 2.68 x 1.97 inch (100x68x50mm) (Pack of 1) (AMAZON)
- KOOBOOK 3Pcs 18650 Lithium Battery Charging Module High Power 15W 5V 3A UPS Step-Up Booster DC-DC Charger Board for Uninterruptible Power Supply Applications (AMAZON)
- 4pcs/pack 2m/6.56ft Black 5.5mm x 2.1mm DC Plug Extension Cable DC Extension Cable for Power Adapter, 12v dc Extension 5.5mm x 2.1mm Extension (AMAZON)
NOTE: The circuit cards and the DC extension cables are sold in groups of 3 and 4 respectively. You only need one each so partner up with someone else looking to put together the project and split the cost.
INSTRUCTIONS
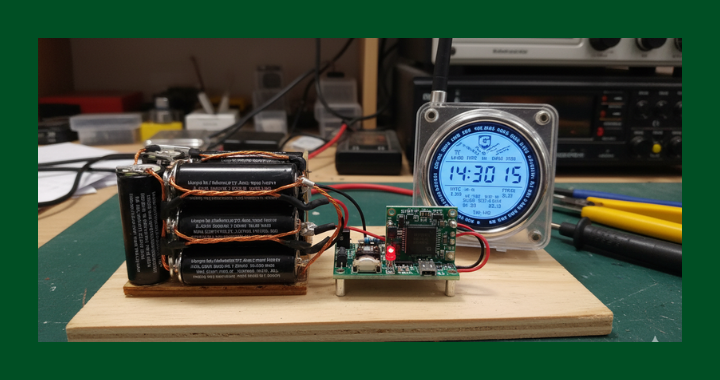
- Cut the DC Plug extension cable in the middle separating the Male and Female barrel connectors. This will provide the plugs for the input and output of the UPS.


- Solder the Red wire from the MALE Barrel end to the UPS + of the output on the circuit card. Solder the BLACK to the UPS – — This will be the OUTPUT of the card to the INOVATO HamClock.


Female Barrel Connector Male Barrel Connector - Solder the Red and Black wires from the FEMALE side of the DC Plug Extension to the 5V+ (Red Wire) and the 5V− (Black wire) points on the circuit card.
- If you want to mount the device into a project box, make sure you leave the battery mount accessible.

- Plug the original power supply from the INOVATO HamClock into the Female connector of the UPS. Plug the Male connector from the UPS into the Inovato HamClock.
- Insert two 18650 LiPO4 batteries and you are done! This circuit will not only act as a UPS, but it will also keep the batteries properly charged and ready.
This device also has a USB C connector on the input. It can be used with any 5 Volt input and the output connector can be replaced with any type of connector that fits the device you are supporting. (EX. If you are running a Raspberry Pi, you can replace the output connector shown here with a USB Connector to plug into the Pi…)